|
- ALWAYS remove the batteries before working on your XMOD!!!
- Add the Metal Bearing Upgrade ASAP! The longer you wait, the more the bushing holes elongate and when you do try to install
the bearings, they will not fit tight.
- Buy a Good set of mini screwdrivers! Using the supplied screwdriver can result in damage to the plastic screw bosses due
to improper tightening. Just take a walk over to any tool isle and you can pick-up a nice mini screwdriver set for about $10
- Sand the Shock Tubes, the Suspension Upgrade is a worth while investment that greatly improves the handling. The plastic
shock bodies have burrs on them that should be sanded off, use a small flat hobby file to do this.
- For those trying to reduce weight, there are Carbon Fiber driveshafts available one site that sells them is AtomicMods.com
- If you are drag racing your XMOD and do not need to take high-speed turns, you can convert your ball-bearing differential
to a locker for better traction. To do this, disassemble the rear axle assembly, remove the 3 screws holding the differential
together and insert a small dab of Silly Putty. Some people have used glue, but note that glue is NOT reverseable and can
hinder cornering ability of your XMOD.
- Tire Compound Usage: some preferred set-up configurations
| Tire configurations |
Soft Rubber |
Hard Rubber |
|
Front wheels |
More Steering Response
Oversteer |
Less Steering Response
Understeer |
|
Rear wheels |
More Traction
Drag Racing |
Less Traction
Overrsteer
Drifting |
- To give your XMOD that 'personal touch', you can buy almost any 1:2X Scale Model from a hobby shop and adapt the body
to fit your XMOD. Your XMOD has three different settings to adjust chassis length on the bottom and top of the rear axle assembly
to fine-tune the wheelbase to match the model body.
- To get an even more personalized look, add vinyl graphics. Get some colored adhesive vinyl sheets from your local office
supply store and cut-out your own graphics. By using vinyl, it is easy to remove when you want to change the look of your
car.
- If you have upgraded to the Metal Bearings, you need to clean them every so often to keep the dirt and grime from building
up in them. The easiest method is to remove the bearings and soak them in Isopropyl Alcohol overnight. When you get up the
next morning, remove them, dry them off with compressed air and lube them with a lightweight lube for longer lasting performance.
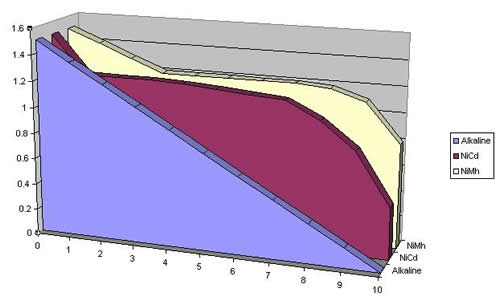
- Buy a good set of NiMh Rechargable batteries for your XMOD. Alkaline batteries do provide a better voltage at full charge,
but as you can see from the plot below, it will drop over the life of the battery resulting in a linear loss of performance.
A NiMh battery will provide a more consistant performance over it's life cycle.
- Tips for Motors
- Use a pinion puller when changing pinion gears. If you use a vise, you can put burrs on the pinion teeth that will increase friction and make
the car run slower. Using your teeth is bad for obvious reasons such as un-needed crowns!
- Keep the capacitors on the motor. They are not hurting performance by being there. What they are doing is protecting the
motor from high-frequency harmonics and brush arching.
- When disassembling or re-assembling a motor with carbon brushes, use a paperclip or tweezers to spread the brushes apart
to clear the commutator. Carbon brushes are very brittle and can break if you subject them to excessive side loads.
- Do not try to modify the number of windings on your motor and then test it by just installing it into your car. If you
remove too many windings, you decrease the motor impedance and therefore it will draw more current through the FET. If this
current is too high, you can damage the FET and/or the ESC. Always measure the motor using a current meter to make sure your
FET's can handle it.
- Building the "Perfect Motor" ... Remember, there is trade-offs when making different mods to your motor. By increasing
torque, you reduce top end. By increasing top speed, you reduce torque. The "perfect motor" must meet your racing needs. There
is a VERY delicate balance in the fine-tuning of these motors to provide you with the best "bang for your buck".
XMOD motors use carbon brushes to transfer power to the armature. These brushes are square when new and the armature is
round. If you run a new motor at full power without breaking the brushes in, you will decrease the life AND performance of
the motor. There are several methods floating around the internet to properly 'break-in' a motor. WE DISCOURAGE USING THE
WATER DRIP METHOD! Common sense tells us that water + metal = corrosion! Instead we suggest running the motor at 1/2 the rated
voltage for 15 minutes to properly break-in the brushes.
Speed comparision chart for stock Stage 1 or Stage 2 motors,
these are real world numbers, other sites may report faster speeds due to the use of a 'speed checker' this device is a 'bench'
test rather the true real measured speed on the track.
| Stage 1 (26,000 rpm) |
WHITE 8 tooth |
15Km/h (9.3 MPH) |
Gear Ratio=6 |
| RED 9
tooth |
17Km/h (10.6 MPH) |
Gear Ratio=5.11 |
| YELLOW
10 tooth |
19Km/h (11.8 MPH) |
Gear Ratio=4.40 |
| BLUE 11
tooth |
21Km/h (13.0 MPH) |
Gear Ratio=3.82 |
| Stage 2 (30,000 rpm) |
WHITE 8 tooth |
19Km/h (11.8 MPH) |
Gear Ratio=6 |
| RED 9
tooth |
21Km/h (13.0 MPH) |
Gear Ratio=5.11 |
| YELLOW 10 tooth
|
24Km/h (14.9 MPH) |
Gear Ratio=4.40 |
| BLUE 11
tooth |
26Km/h (16.2 MPH) |
Gear Ratio=3.82 |
|